Yamaha Moto 4 Carburetor Cleaning, Reassembly, and Adjustment Settings
In this post we’ll review how to clean, reassemble, and adjust a Mikuni carburetor on my father-in-law’s 1988 Yamaha Moto 4 ATV (step-by-step).
This carb is very similar to many other 1980s, 1990s, and some early 2000s carbs on Japanese ATVs and dirt bikes. I also summarize some of my research on the Moto 4 including carburetor adjustment settings, specs, parts diagram, and a high level overview of some of the models, including the one I worked on.
1. Disassemble and Clean the Carburetor
- Disassembly: Fully disassemble the carburetor, separating all components.
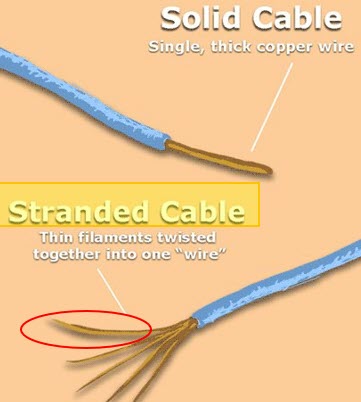
- Cleaning: Soak all parts in carb cleaner (this stuff is amazing!), focusing on removing all dirt and debris. Use a toothbrush and small wires (e.g., twist ties, fly tying ribbing, or one of the small copperer wires from stranded wire – Figure 1) to clean out holes, especially in the jets.
- Compressed Air: Use compressed air (from an air compressor or a can of compressed air) to blow through all passages and jets to ensure they are clear.
Figure 1.

2. Pilot Screw Installation
- Components: Pilot screw, spring, washer, and rubber gasket (in that order) – see video at 1:03
- Installation: Screw the pilot screw all the way in until it is tight. Then, back it out 1.5 turns for the default setting. This setting fine-tunes the idling once the carburetor is back on the ATV. Once warmed up and idling, turn it in out and out a 3/4 turn at a time and listen for increases or decreases in idle speed. You want the idle speed to be maximized – this means you’ve found the sweet spot (ideal combo of fuel to air). As such, adjust either in or out from the default setting to accomplish this.
3. Pilot Jet Installation
- Installation: Insert the pilot jet and screw it in until it is tight – see video at 1:33
4. Main Jet Installation
- Installation: Hand-tighten the main jet, then give it a small additional turn with a wrench – see video at: 1:41
5. Gas Splash Plate Installation
- Installation: Place the gas splash plate back on and secure it with the screw and washer – see video at 1:51
6. Float Installation
- Components: Float and pin.
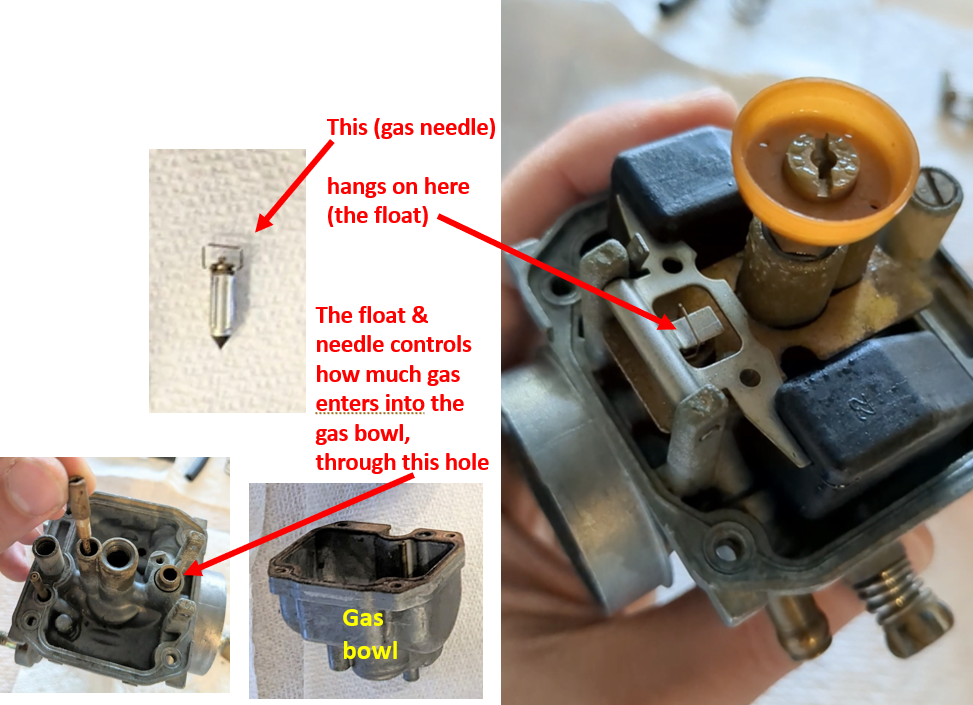
- Installation: Hang the float on its bracket and slide the pin through to secure it. Ensure the float moves freely. And don’t forget about the gas needle – Figure 2.
Figure 2.

7. Gas Baffle Installation
- Installation: Position the baffle on the carburetor main jet (as seen in Figure 2). It will be held in place once the gas bowl is installed – see video at 2:17
8. Gas Bowl Gasket Inspection
- Inspection: Check the gasket for any wear or damage. Replace if necessary. If the gasket is in good condition (i.e. you expect it to make a complete seal), proceed with reassembly – see video at 2:34
9. Gas Bowl Screw Installation
- Installation: Screw the gas bowl back onto the carburetor. Reattach the screws to hold everything in place. Tighten in a cross hatch pattern like you would a car tire – see video at 2:56
10. Idle Speed Adjustment Screw
- Adjustment: Wait to fully screw in the throttle adjustment until the throttle slide is reinstalled. This will allow you to properly set the idle speed once the carburetor is back on the machine –see video at 3:01
11. Starter Plunger (Choke) Installation
- Installation: Insert the spring back into the starter plunger housing and screw it in place – see video at 3:18
12. Throttle Slide, Main Jet Needle, and Default Needle Setting
- Components: Throttle slide, needle, and retainer spring.
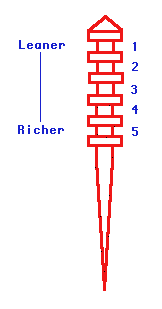
- Setting: The needle should be set to position 3 (middle setting). This is the default setting. Position #1 is at the top – this is the leanest setting. Position #5 is the richest. See Figure 3.
- Cleaning: Lightly clean any gunk off the needle, if present.
- Installation: Insert the needle into the throttle slide, then secure it in place with the retainer spring. Then align the slide with the protrusion on the carburetor body, ensuring smooth movement – see video at 3:30
Figure 3.

13. O-ring Installation
- Components: O-ring.
- Installation: Place the O-ring on the carburetor where it attaches to the engine. Ensure a proper seal to prevent air leaks – see video at 5:18
14. Reassemble and Final Checks
- Final Assembly: Reattach any remaining parts and hoses once the carburetor is back on the machine.
- Adjustment: Fine-tune the pilot screw and throttle adjustment once the carburetor is installed to achieve optimal performance.
Here is a link to the full carb schematic: https://www.yamahapartshouse.com/oemparts/a/yam/500388f5f870021f60a09e29/carburetor
Yamaha Moto 4 ATV History
Yamaha introduced the Moto 4 series in 1985, marking their foray into the 4-wheel ATV market. The Moto 4 was one of the first utility ATVs, offering a blend of power, reliability, and versatility that appealed to a wide range of users. Over the years, Yamaha continued to refine the Moto 4, incorporating advancements in technology and design to meet the evolving needs of riders.
The early models of the Moto 4 series, such as the Yamaha Moto 4 200, were equipped with a reliable 196cc four-stroke engine. This engine provided sufficient power for both recreational riding and light utility work.
Later models, like the Moto 4 350, featured a more powerful 350cc engine, offering enhanced performance for more demanding tasks and more aggressive riding.
Transmission and Drive
The Yamaha Moto 4 ATVs were known for their robust transmission systems. Most models featured a 5-speed manual transmission with reverse, allowing for smooth and precise control over various terrains. The drive system typically included a shaft drive, which is preferred for its low maintenance and reliability compared to chain-driven systems.
One of the standout features of the Yamaha Moto 4 ATVs was their utility-focused design. With features like front and rear cargo racks, these quads were perfect for hauling gear, tools, or supplies. The versatility of the Moto 4 made it a popular choice for farmers, hunters, and outdoor enthusiasts who needed a reliable and capable ATV for both work and play.
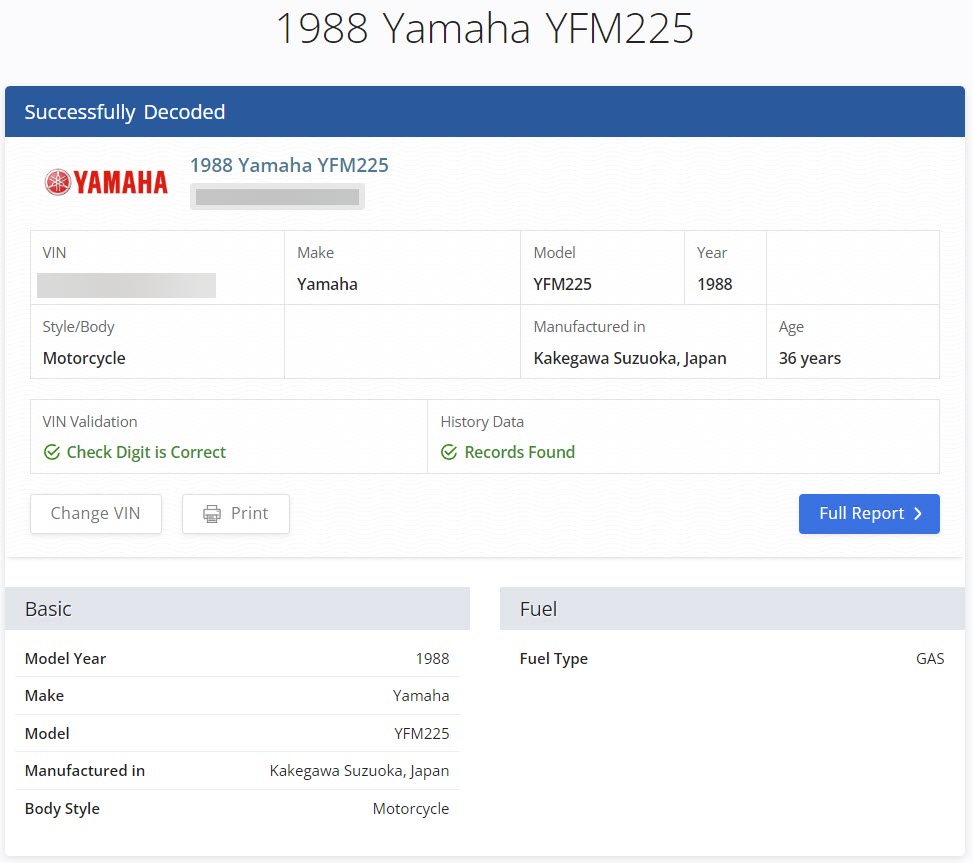
My father-in-law’s is the 1988 Yamaha Moto 4 YFM225 – high level overview and detailed specs (as found from around the web), below:
Obtained from https://www.faxvin.com/vin-decoder/yamaha

Engine and Performance
- Engine Type: 223cc, air-cooled, four-stroke, single-cylinder engine.
- Bore and Stroke: 70.0 mm x 58.0 mm.
- Compression Ratio: 9.0:1.
- Fuel System: Mikuni VM24SS carburetor, designed to provide a consistent and efficient fuel-air mixture.
- Ignition: CDI (Capacitor Discharge Ignition) system for reliable starting and smooth operation.
Transmission and Drive
- Transmission: 5-speed manual transmission with reverse.
- Drive System: Shaft drive, which is known for its durability and low maintenance compared to chain-driven systems.
- Clutch: Wet multi-plate clutch, ensuring smooth gear shifts and ease of use.
Suspension and Handling
- Front Suspension: Independent double-wishbone with 4.9 inches of travel, providing a smooth ride over rough terrain.
- Rear Suspension: Swingarm with a single shock absorber and 4.3 inches of travel, designed for stability and comfort.
- Brakes: Front and rear drum brakes, offering reliable stopping power in various conditions.
Dimensions and Weight
- Overall Length: 71.9 inches (182.6 cm).
- Overall Width: 40.2 inches (102.1 cm).
- Overall Height: 42.1 inches (107.0 cm).
- Seat Height: 28.7 inches (72.9 cm).
- Wheelbase: 45.7 inches (116.1 cm).
- Ground Clearance: 5.7 inches (14.5 cm).
- Dry Weight: Approximately 392 lbs (178 kg).
Utility and Features
- Cargo Racks: Equipped with front and rear cargo racks, making it ideal for hauling gear, tools, or supplies.
- Fuel Capacity: 2.4 gallons (9.1 liters), providing a good range for extended rides.
- Tires: Front: AT21x8-9, Rear: AT22x11-8, designed to handle various terrains with ease.
Carburetor Details
- Carburetor Model: Mikuni VM24SS.
- Features: The VM24SS carburetor is known for its reliability and ease of maintenance. It includes adjustable idle speed and air/fuel mixture screws, allowing users to fine-tune performance based on riding conditions.
Popular Yamaha Moto 4 Models (and associated carburetor details)
Yamaha Moto 4 200 (1984-1989)
- Engine: 196cc, air-cooled, four-stroke
- Transmission: 5-speed manual with reverse
- Suspension: Independent front suspension, swingarm rear suspension
- Notable Features: Known for its balance of power and maneuverability, ideal for recreational and light utility use.
- Carburetor Type: Mikuni VM22SS
- Features: The Mikuni VM22SS carburetor is known for its reliability and ease of maintenance. The 22mm bore size is well-suited for the 196cc engine, providing efficient fuel atomization and consistent performance.
Yamaha Moto 4 250 (1989-1991)
- Engine: 229cc, air-cooled, four-stroke
- Transmission: 5-speed manual with reverse
- Suspension: Independent front suspension, swingarm rear suspension
- Notable Features: Known for its enhanced power and capability, suitable for more demanding tasks and terrains.
- Carburetor Type: Mikuni VM24SS
- Features: Equipped with a Mikuni VM24SS carburetor, the Moto 4 250 benefits from a slightly larger 24mm bore, offering improved fuel delivery for the 229cc engine. This enhancement results in better power output and throttle response.
- Adjustments: Similar to the VM22SS, the VM24SS has user-adjustable settings for idle speed and air/fuel mixture, enabling riders to optimize engine performance.
Yamaha Moto 4 350 (1987-1995)
- Engine: 350cc, air-cooled, four-stroke
- Transmission: 5-speed manual with reverse
- Suspension: Independent front suspension, swingarm rear suspension
- Notable Features: Offers significant power and performance, making it a favorite for heavy-duty utility work and more aggressive riding.
- Carburetor Type: Mikuni VM32SS
- Features: The Moto 4 350 features a Mikuni VM32SS carburetor with a larger 32mm bore. This design handles the increased fuel requirements of the 350cc engine, delivering robust performance and efficiency.
- Adjustments: The VM32SS provides comprehensive tuning options, including idle speed and air/fuel mixture adjustments, to accommodate varying riding environments and ensure the engine runs smoothly.
