thomfixes
Best Live Sonar Poles & Mounts for BC Stillwater Trout Fishing 2026 – Cariboo Guide
The Missing Piece of Live Sonar for BC Trout Fishing: Best Poles & Mounts for Cariboo Stillwater Lakes (2026 Guide)
If you read my last post you already know how much live sonar (Garmin LiveScope, Humminbird MEGA Live 2, or Lowrance ActiveTarget 2) changes things when you’re chasing rainbows and cutthroats on lakes around 100 Mile House, Williams Lake, and the rest of the Cariboo. You can watch fish swim up to your chironomid, see them turn away, or spot them holding on a drop-off before you even cast. Game changer.
But here’s what almost nobody talks about online: the transducer mount and pole setup is half the battle. You can have the best live sonar in the world, but if you can’t quickly move it, stow it, or switch boats without a 10-minute production, you’ll end up frustrated and leave it in the truck. I fish multiple boats (prams, truck boats, the occasional bigger rig) and I’ve learned this the hard way over hundreds of days on the water.
Quick Recap – The Three Live Sonar Options for BC Trout
Garmin LiveScope Plus (LVS34) is still my go-to for most Cariboo days because of the crisp target separation on suspended rainbows. Humminbird MEGA Live 2 is great if you’re already in that ecosystem, and Lowrance ActiveTarget 2 gives solid value, especially in deeper water. Check current prices here if you’re still deciding:
Garmin LiveScope Plus System on Amazon.ca
The Real Talk: Poles & Mounts for Trout Boats
Once you have the transducer, you need a way to get it in the water, point it where you want, and actually use it while fishing. This is where most guys get stuck.
Fish Finder Mounts stuff is built like a tank — super solid brackets and poles. But if you fish more than one boat (like most of us in the Interior), you’re looking at buying multiple mounts or spending evenings making custom adapters. I’ve done both. I’ve cut, drilled, and borrowed parts from other pole makers just to make one system work across boats. It works, but it’s a pain and easily adds hundreds of dollars.
Pole length matters too. You often need extensions or a telescopic system so you can reach the right depth and angle without the pole slapping the water or catching fly line on every back cast. And don’t get me started on the handle — some of the standard fish-finder poles stay up and love to snag your fly line when you’re casting chironomids or leeches.
What Actually Works for Me (and a Bunch of Other BC Guys)
After trying a bunch of setups, I landed on the Summit Fishing pole system and I’m not looking back. It clicks into a Scotty 241L in literally one second. You can yank it out, lay it on the floor, run to the next spot, and click it back in — no tools, no re-adjusting every time the wind switches.
The Summit has a stabilizer plate so it doesn’t chatter when you’re moving at 2-3 knots, and the handle design folds down and out of the way so it doesn’t catch fly line. Customers who switched from other systems (including Brian Chan and Steve Maricle) say the same thing — it’s quicker to stow and way more adaptable with Scotty accessories.
If your boat has a track system, pair it with a Scotty 343 track mount and you can slide the whole thing wherever you need it. Even without a track, a couple of well-placed 241L bases on an 8-12 ft pram works great.
Summit Telescoping Carbon Fiber Transducer Pole on Amazon.ca
Scotty 241L Locking Mount on Amazon.ca
My Honest Take After Fishing Multiple Boats
Different strokes for different people, but for me the Summit system wins because it’s fast, lightweight, and actually portable across boats without buying a whole new kit every time. I can have it set up at the right angle and depth, then click it out in seconds when I need to move. That kind of speed matters when you’re hunting spooky trout on clear Cariboo water.
Easy to drop close to a grand once you add poles, mounts, extensions, and adapters. But once it’s dialed, you’ll wonder how you ever fished without it.
Final Recommendations for BC Trout Anglers
- Best overall live sonar + pole combo for most guys: Garmin LiveScope Plus + Summit telescoping pole.
- If you run Humminbird or Lowrance, the same Summit pole works great with the right transducer mount.
- Want the quickest on/off setup? Scotty 241L bases (or a track system if your boat has one).
Tight lines out there — stillwater season is here and the fish are looking up. If you have questions about your specific boat setup, drop them in the comments. I’ve been through the trial-and-error so you don’t have to.
Best Live Sonar for BC Interior Lakes 2026: Garmin LiveScope vs Humminbird MEGA Live vs Lowrance ActiveTarget – Cariboo Guide
Best Live Sonar for BC Interior Lakes in 2026: Garmin LiveScope vs Humminbird MEGA Live vs Lowrance ActiveTarget – Guide for Cariboo Anglers (100 Mile House, Williams Lake Areas)

Garmin LiveScope screen capture from a BC Interior lake. You can clearly see the #16 chironomid, micro swivel/split shot, and multiple fish reacting to the presentation at 22 feet. The forward view gives excellent resolution out to about 50 feet.
Fishing the lakes around 100 Mile House, Williams Lake, and the broader Cariboo Chilcotin means dealing with a wide variety of lake types, fishing conditions, and techniques. Traditional depth sounders / sonar help, but forward-facing live sonar changes everything — you literally watch fish approach your chironomid or leech, see if they’re turning away, or know instantly if fish are even in the area.
The guessing of whether you’re in the “right spot” or if you’ve got the right fly or depth is significantly reduced! For those fishing “trophy lakes” where densities are low but fish are huge, having a live scope can be the difference between 0–1 fish days and getting a few or more.
For BC Interior anglers, the big three — Garmin LiveScope, Humminbird MEGA Live 2, and Lowrance ActiveTarget 2 — all work well on lakes in this region. I’ve run them on local waters and break it down here so you can pick what fits your boat and your setup without the guesswork.
What Live Sonar Brings to BC Interior Lakes
Real-time views ahead or below your trolling motor let you:
- Locate rainbows in shallows or drop-offs, or suspended/cruising trout up to 80 ft. Excellent for shallower lakes like Simon or Fawn, to mid-depth lakes like Valentine, Sheridan, or Forrest.
- Track how trout react to your suspended chironomid or leech, or your stripped nymph (do they inspect and spook, or commit?). On indicator setups you can even see your chironomid, micro swivel, and split shot!
- Spot trout (or other target species) holding tight to drop-offs, weeds, or sunken logs before casting.
- Scout structure in murkier shallows or deeper Cariboo spots without blind searching.
Live sonar works great alongside your standard 2D/CHIRP sonar (the classic down-view for mapping the lake bottom contours and depth). It shines brightest when mounted on your trolling motor for precise aiming and control on these lakes.
Head Unit vs Transducer: Don’t Get This Wrong
Transducer = the underwater scanner (typically mounted on your trolling motor); though pole mounts are gaining in popularity.
Head unit = your screen (processes and displays the live feed).
They must match brands/models — no mixing. Garmin usually needs a GLS 10 black box; Humminbird plugs direct; Lowrance’s black box is included in most kits. Check your current screen first to avoid extra costs.
The Three Systems Compared for BC Lakes
Garmin LiveScope (Plus / XR)
Top pick for most Cariboo anglers — crisp images, great target separation in weeds or near bottom, and low clutter. The Plus (LVS34) covers typical BC lake ranges perfectly; the XR adds extra reach for bigger or deeper waters.
Pros: Best detail for seeing individual rainbows and exactly how they react to your presentation.
Check Current Price – Garmin LiveScope Plus System (with GLS 10 black box)
Humminbird MEGA Live 2
Strong performer for suspended fish and longer views. No extra black box needed if you have an APEX, SOLIX G3, or XPLORE unit. Integrates seamlessly if you’re already in the Humminbird ecosystem.
Pros: Simple setup and good performance in variable BC water clarity.
Check Current Price – Humminbird MEGA Live 2 Transducer
Lowrance ActiveTarget 2
Solid value option that excels in deeper structure (deepwater rainbows, kokanee, lake trout). Great if you already run Lowrance screens.
Pros: Affordable entry point with wide coverage.
Check Current Price – Lowrance ActiveTarget 2 Kit (black box included)
My Experience on Cariboo Lakes
I’ve spent thousands of hours on waters around Princeton, Merritt, Kamloops, 100 Mile House, and Williams Lake chasing rainbows, brook trout, and kokanee. Live sonar has been a total game-changer. It makes all the difference when starting on a new lake, on those tough days when fish are hard to find, or when hunting trophy trout. The ability to tweak your presentation and depth in real time — and actually see what’s going on — is simply unmatched.
Choosing for Your BC Setup
- Already own a head unit? Verify compatibility first — it can save you $800–$1,500.
- Buying new? Go with a 9–12″ screen for the clearest live views.
- Recommended screens:
- Garmin: ECHOMAP Ultra 2 (9″)
- Humminbird: XPLORE 9
- Lowrance: HDS PRO, HDS LIVE, or Elite FS series
- Mount: Trolling motor shaft is most common and easiest. Pole mounts are also popular for independent control.
- Budget: $1,400–$2,200 for the live sonar piece alone; full setups with screen usually $2,800+.
Recommendations
- Best overall for BC Interior lakes: Garmin LiveScope Plus — the clarity wins on our waters.
- If you’re already in the Humminbird ecosystem: MEGA Live 2.
- Best value pick: Lowrance ActiveTarget 2.
All three systems are available on Amazon.ca with fast Prime shipping. Click the links above for the latest prices and real reviews from other Canadian and US anglers.
Final Thoughts
Live sonar takes a bit of time to get familiar with, but on BC Interior lakes it quickly pays off with more hookups. Mount it right, spend a few afternoons learning the modes, and you’ll see why it’s worth every penny.
Tight lines in the Interior! Stillwater season is upon us.
DIY Bike Toolkit for Under $25
Hey folks,
Thom from Thom Fixes here. We’re all about DIY for motorcycle lovers, and today we’re tackling a common expense – your toolkit. Let’s see how we can build one without breaking the bank.
I recently tackled this with my 1982 Honda XL80s, and I’m here to show you how you can do the same for your ride, whatever model it might be. The goal? To keep more cash in your pocket for actual riding.
Step 1: Assessing Your Bike’s Needs
- 8mm, 10mm, 12mm wrenches
- 8mm, 10mm, 12mm sockets, with socket wrench
- A spark plug socket
- Screw driver(s)
- Pliers
- Spare fuses (various sizes, 5-15A are most common, to cover you or your buddy’s bike)
- Tire pressure gauge
- Zap straps, electrical tape, spare wire, carabiners, bungee cord, shoe goo,
- and whatever else you might think is handy (e.g. medical or safety equipment).
I found this out by Google searching for pre-made tool kits for my bike. Once I found one, I clicked on the details to see all the required wrench sizes and alike.
Step 2: The Thrifty Hunt
- Second-hand tools: Often just as good as new and much cheaper. Look for tools made in USA, Japan, Europe, or Canada. Avoid Chinese-made tools if you can help it.
- Multi-tools: These can cover a range of sizes and functions, saving space and money. A Leatherman, with a saw, is a great one!
Step 3: Building Your Toolkit
- Tool Roll: I’m planning to make my own, but if you want to purchase one, here’s an Amazon option: https://amzn.to/42588G6
- Old Ammo Can: If you’ve got one lying around, they’re tough and weather-resistant.
- Bike-specific Bags: Look for saddlebags or tail bags that are meant for motorcycle storage.
Step 4: Custom Fit for Your Ride
- Where can you mount your toolkit?
- How can you secure it for safety during rides?
Step 5: The Final Touch
Yamaha Moto 4 Carburetor Cleaning, Reassembly & Adjustment Guide (Mikuni VM24SS)
In this post we’ll review how to clean, reassemble, and adjust a Mikuni carburetor on my father-in-law’s 1988 Yamaha Moto 4 ATV (step-by-step).
This carb is very similar to many other 1980s, 1990s, and some early 2000s carbs on Japanese ATVs and dirt bikes. I also summarize some of my research on the Moto 4 including carburetor adjustment settings, specs, parts diagram, and a high level overview of some of the models, including the one I worked on.
1. Disassemble and Clean the Carburetor
- Disassembly: Fully disassemble the carburetor, separating all components.
- Cleaning: Soak all parts in carb cleaner (this stuff is amazing!), focusing on removing all dirt and debris. Use a toothbrush and small wires (e.g., twist ties, fly tying ribbing, or one of the small copper wires from stranded wire – Figure 1) to clean out holes, especially in the jets.
- Compressed Air: Use compressed air (from an air compressor or a can of compressed air) to blow through all passages and jets to ensure they are clear.
Figure 1.
2. Pilot Screw Installation
- Components: Pilot screw, spring, washer, and rubber gasket (in that order) – see video at 1:03
- Installation: Screw the pilot screw all the way in until it is tight. Then, back it out 1.5 turns for the default setting. This setting fine-tunes the idling once the carburetor is back on the ATV. Once warmed up and idling, turn it in out and out a 3/4 turn at a time and listen for increases or decreases in idle speed. You want the idle speed to be maximized – this means you’ve found the sweet spot (ideal combo of fuel to air). As such, adjust either in or out from the default setting to accomplish this.
3. Pilot Jet Installation
- Installation: Insert the pilot jet and screw it in until it is tight – see video at 1:33
4. Main Jet Installation
- Installation: Hand-tighten the main jet, then give it a small additional turn with a wrench – see video at: 1:41
5. Gas Splash Plate Installation
- Installation: Place the gas splash plate back on and secure it with the screw and washer – see video at 1:51
6. Float Installation
- Components: Float and pin.
- Installation: Hang the float on its bracket and slide the pin through to secure it. Ensure the float moves freely. And don’t forget about the gas needle – Figure 2.
Figure 2.
7. Gas Baffle Installation
- Installation: Position the baffle on the carburetor main jet (as seen in Figure 2). It will be held in place once the gas bowl is installed – see video at 2:17
8. Gas Bowl Gasket Inspection
- Inspection: Check the gasket for any wear or damage. Replace if necessary. If the gasket is in good condition (i.e. you expect it to make a complete seal), proceed with reassembly – see video at 2:34
9. Gas Bowl Screw Installation
- Installation: Screw the gas bowl back onto the carburetor. Reattach the screws to hold everything in place. Tighten in a cross hatch pattern like you would a car tire – see video at 2:56
10. Idle Speed Adjustment Screw
- Adjustment: Wait to fully screw in the throttle adjustment until the throttle slide is reinstalled. This will allow you to properly set the idle speed once the carburetor is back on the machine –see video at 3:01
11. Starter Plunger (Choke) Installation
- Installation: Insert the spring back into the starter plunger housing and screw it in place – see video at 3:18
12. Throttle Slide, Main Jet Needle, and Default Needle Setting
- Components: Throttle slide, needle, and retainer spring.
- Setting: The needle should be set to position 3 (middle setting). This is the default setting. Position #1 is at the top – this is the leanest setting. Position #5 is the richest. See Figure 3.
- Cleaning: Lightly clean any gunk off the needle, if present.
- Installation: Insert the needle into the throttle slide, then secure it in place with the retainer spring. Then align the slide with the protrusion on the carburetor body, ensuring smooth movement – see video at 3:30
Figure 3.
13. O-ring Installation
- Components: O-ring.
- Installation: Place the O-ring on the carburetor where it attaches to the engine. Ensure a proper seal to prevent air leaks – see video at 5:18
14. Reassemble and Final Checks
- Final Assembly: Reattach any remaining parts and hoses once the carburetor is back on the machine.
- Adjustment: Fine-tune the pilot screw and throttle adjustment once the carburetor is installed to achieve optimal performance.
Here is a link to the full carb schematic: https://www.yamahapartshouse.com/oemparts/a/yam/500388f5f870021f60a09e29/carburetor
Yamaha Moto 4 ATV History
Yamaha introduced the Moto 4 series in 1985, marking their foray into the 4-wheel ATV market. The Moto 4 was one of the first utility ATVs, offering a blend of power, reliability, and versatility that appealed to a wide range of users. Over the years, Yamaha continued to refine the Moto 4, incorporating advancements in technology and design to meet the evolving needs of riders.
The early models of the Moto 4 series, such as the Yamaha Moto 4 200, were equipped with a reliable 196cc four-stroke engine. This engine provided sufficient power for both recreational riding and light utility work.
Later models, like the Moto 4 350, featured a more powerful 350cc engine, offering enhanced performance for more demanding tasks and more aggressive riding.
Transmission and Drive
The Yamaha Moto 4 ATVs were known for their robust transmission systems. Most models featured a 5-speed manual transmission with reverse, allowing for smooth and precise control over various terrains. The drive system typically included a shaft drive, which is preferred for its low maintenance and reliability compared to chain-driven systems.
One of the standout features of the Yamaha Moto 4 ATVs was their utility-focused design. With features like front and rear cargo racks, these quads were perfect for hauling gear, tools, or supplies. The versatility of the Moto 4 made it a popular choice for farmers, hunters, and outdoor enthusiasts who needed a reliable and capable ATV for both work and play.
My father-in-law’s is the 1988 Yamaha Moto 4 YFM225 – high level overview and detailed specs (as found from around the web), below:
Obtained from https://www.faxvin.com/vin-decoder/yamaha

Engine and Performance
- Engine Type: 223cc, air-cooled, four-stroke, single-cylinder engine.
- Bore and Stroke: 70.0 mm x 58.0 mm.
- Compression Ratio: 9.0:1.
- Fuel System: Mikuni VM24SS carburetor, designed to provide a consistent and efficient fuel-air mixture.
- Ignition: CDI (Capacitor Discharge Ignition) system for reliable starting and smooth operation.
Transmission and Drive
- Transmission: 5-speed manual transmission with reverse.
- Drive System: Shaft drive, which is known for its durability and low maintenance compared to chain-driven systems.
- Clutch: Wet multi-plate clutch, ensuring smooth gear shifts and ease of use.
Suspension and Handling
- Front Suspension: Independent double-wishbone with 4.9 inches of travel, providing a smooth ride over rough terrain.
- Rear Suspension: Swingarm with a single shock absorber and 4.3 inches of travel, designed for stability and comfort.
- Brakes: Front and rear drum brakes, offering reliable stopping power in various conditions.
Dimensions and Weight
- Overall Length: 71.9 inches (182.6 cm).
- Overall Width: 40.2 inches (102.1 cm).
- Overall Height: 42.1 inches (107.0 cm).
- Seat Height: 28.7 inches (72.9 cm).
- Wheelbase: 45.7 inches (116.1 cm).
- Ground Clearance: 5.7 inches (14.5 cm).
- Dry Weight: Approximately 392 lbs (178 kg).
Utility and Features
- Cargo Racks: Equipped with front and rear cargo racks, making it ideal for hauling gear, tools, or supplies.
- Fuel Capacity: 2.4 gallons (9.1 liters), providing a good range for extended rides.
- Tires: Front: AT21x8-9, Rear: AT22x11-8, designed to handle various terrains with ease.
Carburetor Details
- Carburetor Model: Mikuni VM24SS.
- Features: The VM24SS carburetor is known for its reliability and ease of maintenance. It includes adjustable idle speed and air/fuel mixture screws, allowing users to fine-tune performance based on riding conditions.
Popular Yamaha Moto 4 Models (and associated carburetor details)
Yamaha Moto 4 200 (1984-1989)
- Engine: 196cc, air-cooled, four-stroke
- Transmission: 5-speed manual with reverse
- Suspension: Independent front suspension, swingarm rear suspension
- Notable Features: Known for its balance of power and maneuverability, ideal for recreational and light utility use.
- Carburetor Type: Mikuni VM22SS
- Features: The Mikuni VM22SS carburetor is known for its reliability and ease of maintenance. The 22mm bore size is well-suited for the 196cc engine, providing efficient fuel atomization and consistent performance.
Yamaha Moto 4 250 (1989-1991)
- Engine: 229cc, air-cooled, four-stroke
- Transmission: 5-speed manual with reverse
- Suspension: Independent front suspension, swingarm rear suspension
- Notable Features: Known for its enhanced power and capability, suitable for more demanding tasks and terrains.
- Carburetor Type: Mikuni VM24SS
- Features: Equipped with a Mikuni VM24SS carburetor, the Moto 4 250 benefits from a slightly larger 24mm bore, offering improved fuel delivery for the 229cc engine. This enhancement results in better power output and throttle response.
- Adjustments: Similar to the VM22SS, the VM24SS has user-adjustable settings for idle speed and air/fuel mixture, enabling riders to optimize engine performance.
Yamaha Moto 4 350 (1987-1995)
- Engine: 350cc, air-cooled, four-stroke
- Transmission: 5-speed manual with reverse
- Suspension: Independent front suspension, swingarm rear suspension
- Notable Features: Offers significant power and performance, making it a favorite for heavy-duty utility work and more aggressive riding.
- Carburetor Type: Mikuni VM32SS
- Features: The Moto 4 350 features a Mikuni VM32SS carburetor with a larger 32mm bore. This design handles the increased fuel requirements of the 350cc engine, delivering robust performance and efficiency.
- Adjustments: The VM32SS provides comprehensive tuning options, including idle speed and air/fuel mixture adjustments, to accommodate varying riding environments and ensure the engine runs smoothly.
Please subscribe to my YouTube channel if you found this helpful. Again, your support is appreciated. Cheers!
Frequently Asked Questions
- What is the default pilot screw setting for Yamaha Moto 4?
- 1.5 turns out from fully seated.
How to Remove a Stuck Wheel Bearing
How to Cure Salmon Roe and Never Get Freezer or Borax Burn
After many, many years of practice, trial, and error I have finally developed a bullet proof process for creating A-grade roe that avoids freezer burn and borax burn.
ROE curing process:
Procure of choice, let it soak/marinate for 24 hours in a Ziploc in the fridge, take out of bag and plop onto paper towel (minimal patting), then get a big bag of fresh borax and thoroughly shake each skein individually in the bag, this takes off all the excess moisture and outcomes a nice shake n’ baked skein with moist pink borax attached to it. I then place as many of these skeins as possible into a plastic jar trying to minimize air space (don’t use glass, I’ve had everyone break that I brought fishing with me). Sometimes, I sprinkle just a little extra dusting of borax in the jar or on each of the skein, just for good measure, but I think I only do this when I think the roe was a little wetter than I would have liked. You want moist, but neither wet nor dry roe.
When fishing, I take the whole jar with me, but then bring a separate zip lock with some borax (not much though) in it for the day of fishing. To my pleasant surprise, the roe can sit in the jar all day unused without any additional borax and still does not get gooey. I know this because sometimes I bring multiple jars and don’t end up using one. The vigorous shakes pre-freeze do very well to stop this process from occurring.
This article would not have been made possible without the years of mentorship I’ve recieved from the Roe Kid. While this recipe deviates from his, I / this recipe would not be of the caliber without him.
-Blade Kid
DYI Sealed Beam Headlight Conversion to LED
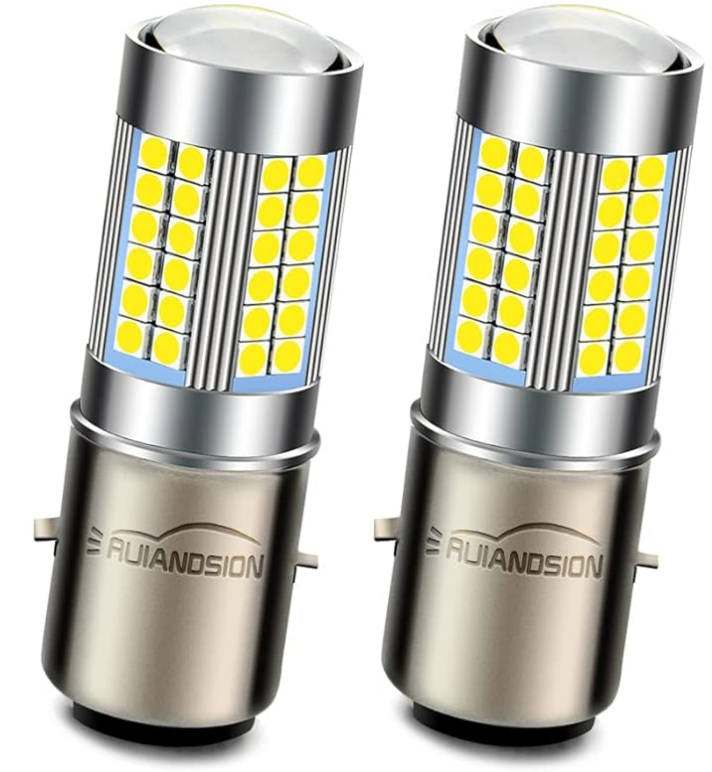
A versatile sealed beam replacement technique demonstrated on my 1982 Honda XL80S motorbike. Here I convert a sealed beam headlight into a LED headlight using some basic tools and supplies and two fairly inexpensive items from Amazon/eBay, all while keeping the original headlight housing!
FULL VIDEO HERE (more info, exact supplies, and tools I used in the text below!)
Below are the 6 Volt LED bulbs I purchased for my 1982 Honda XL 80S and 1984 Honda XL 100. They work great with the 6V battery! I’ve tried 12V bulbs before on the 6V battery, some work (but usually not at full strength light) and others straight up won’t work at all. I’ve ordered other Ruiandsion products before (I think they are German design?) and they seem like decent quality and all seem to be holding up good. These bulbs
 Click Here to Purchase
or Click Here for the 12V version
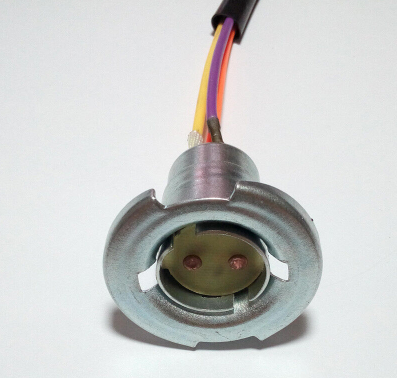
Finding a bulb socket / lamp holder that fit these particular bulbs was actually kind of difficult. I tried 2 different products from Amazon that looked like they would work and/or said they would work, but both turned out to be no-go’s (at least not with some modifications, which I didn’t was a good idea as I didn’t want to increase the chances of causing a short). I searched Ali Express as well, but saw a lot of the same products as I saw on Amazon. Long story short, I found an excellent product and fit on eBay! The wiring connections connect to the original Honda wiring on the bike as well, which is nice! If it’s out of stock, the key is to look for socket / lamp bulb holder type ” BA20D “.
 Click Here to Purchase
And here is what I used to secure the bulb.
(1) Shoe Goo. This product is amazing! So versatile. It bonds to just about everything, is flexible, waterproof, and durable and sets pretty fast too (good to go after a few hours). Epoxy is okay… but it’s not great for bonding plastics, and is more messy and smelly. Ordering from the links below (and above) helps support the website and channel, as I get a very small commission (thank you!) 🙏
 Click Here to Purchase
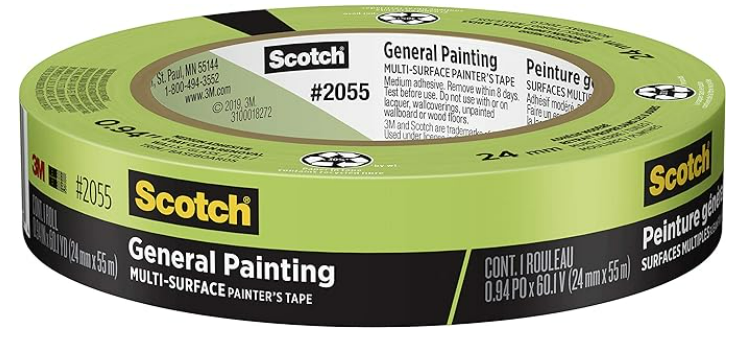
(2) Some tape (any tape will do, but I like painters tape for these sort of things)
 Click Here to Purchase
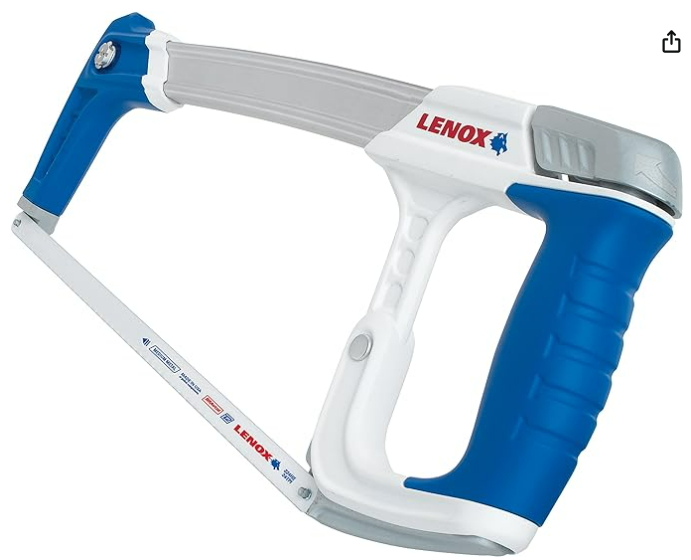
And finally, you’ll need a metal hack saw to cut off the fused bulb socket. You could probably get away with a grinder as well, but your precision may be less and the chances of damaging the light housing increases. The old internal incandescent bulb usually breaks in the process. I took a screw driver and poked it in light housing to break up the glass bulb bits into smaller pieces so that they would shake out easier. Carefully blow (close your eyes first! 😅 ) and/or use some paper towel / a cloth to wipe out the inside of the light housing if needed to get out metal bits or remaining glass (use your screw driver to rotate the cloth/paper towel around). If you do a good job cutting off the old fused bulb socket you should have a nice big round hole and probably don’t even need to Dremel out a wider to get the new LED bulb to fit. NOTE: These last items are a bit more expensive, but if you like fixing things these tools will more than pay for themselves over time. Consider hitting up your local flea market if your budgets are tight – you can’t beat flea market prices and value (those old, but well made US or Japanese tools can’t be beat!!!).
 Click Here to Purchase
 Click Here to Purchase